


One of the problems that come with scaling an app is managing its state. It can get unnecessarily difficult and a headache at times. Vue apps are no exception, but luckily for us, we have Vuex to save us.
In this article, we will:
learn what state and state management is
setup vuex and the vuex store
learn how to use the methods in the store, by creating a few example apps
let's begin!!
State and State management.
To be frank, "state" is a term that has many definitions depending on who you ask. But in layman's terms and for the purpose of this article it is all the data or let's say variables in our application.
When we build robust applications, it is near impossible for our state not to change, the more changes that occur in the application, the harder it is to manage the changes and monitor the changes especially when working with a group of people.
Taa-da that's where state management comes to rescue us from this "hell". State managers provide us with a means to manage our state throughout the app
Vuex
The reason I first talked about state managers is that Vuex itself is a state manager that adopts the facebook flux pattern. Vuex helps us manage state in our Vue application.
Without it, each component will have a separate state of its own. So what Vuex does is that it aggregates all the states in each component into a single state also called a store or the source of truth. Sounds fancy right? 😉
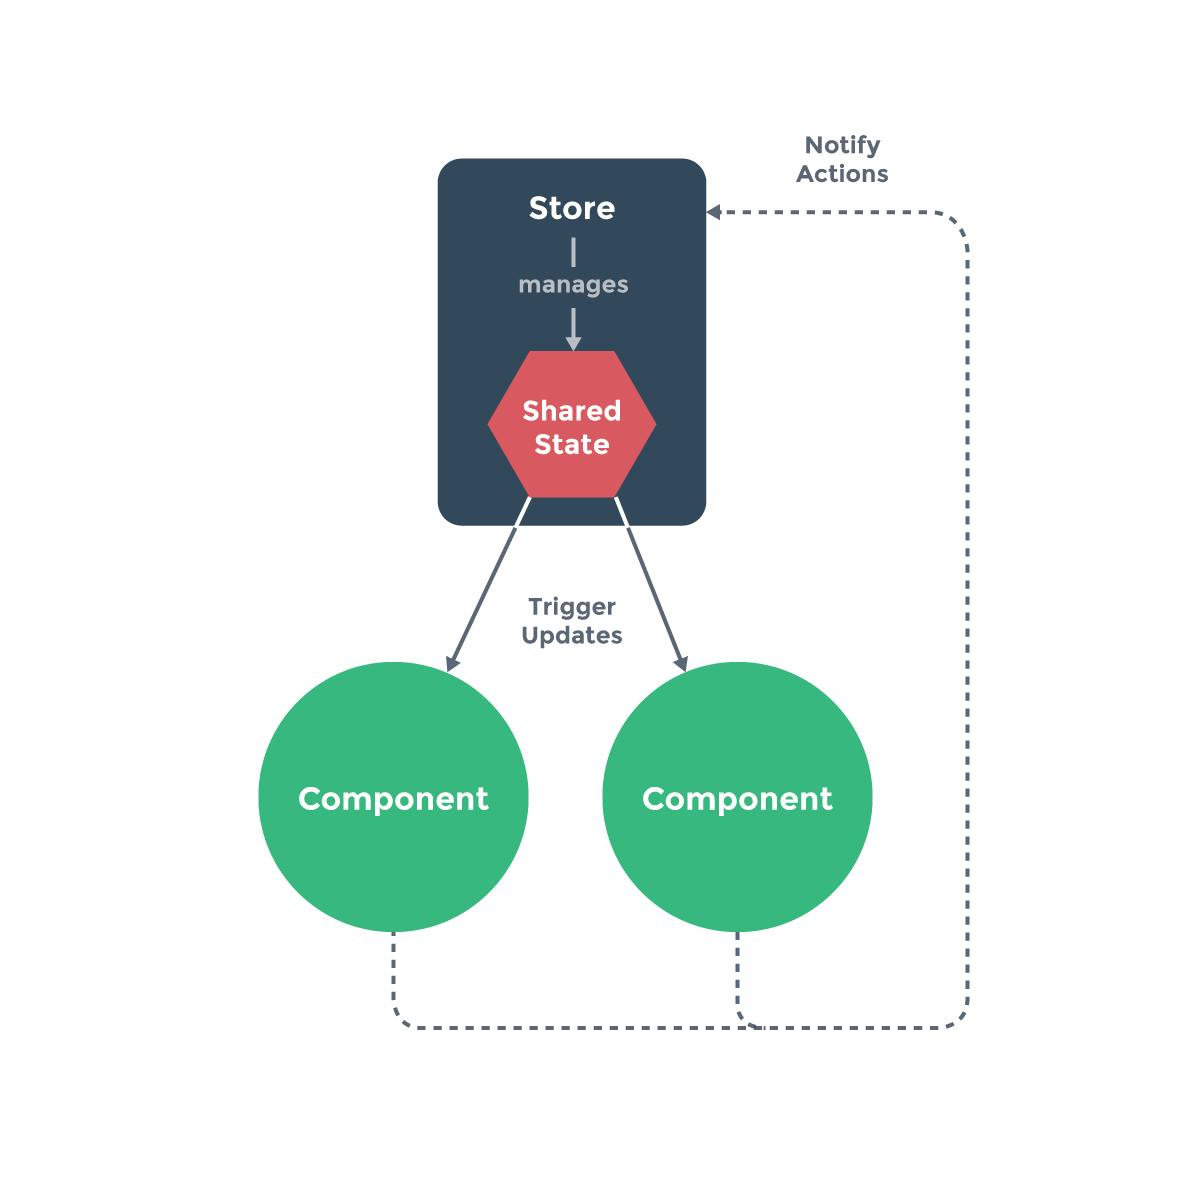
This so-called "source of truth" is also reactive, what this means is that when a component state changes, that change is updated immediately and other components that depend on the component state will also adjust to the change.
Vuex store
We have talked about the store that houses all other component states, But here is the thing. Having one decentralized store to manage all your states, doesn't solve all the problems of state management, because if different components will be updating the state in the central store from different locations and in different ways, things can get a bit unpredictable and untraceable and we need a way to document such changes.
fortunately, there is a whole vuex pattern for managing this which involves some helpful methods available in the store and they are:
- state
- getters
- mutations
Actions
we will talk about them in a bit, but let's set up our vuex store first
Setting up vuex and vuex store
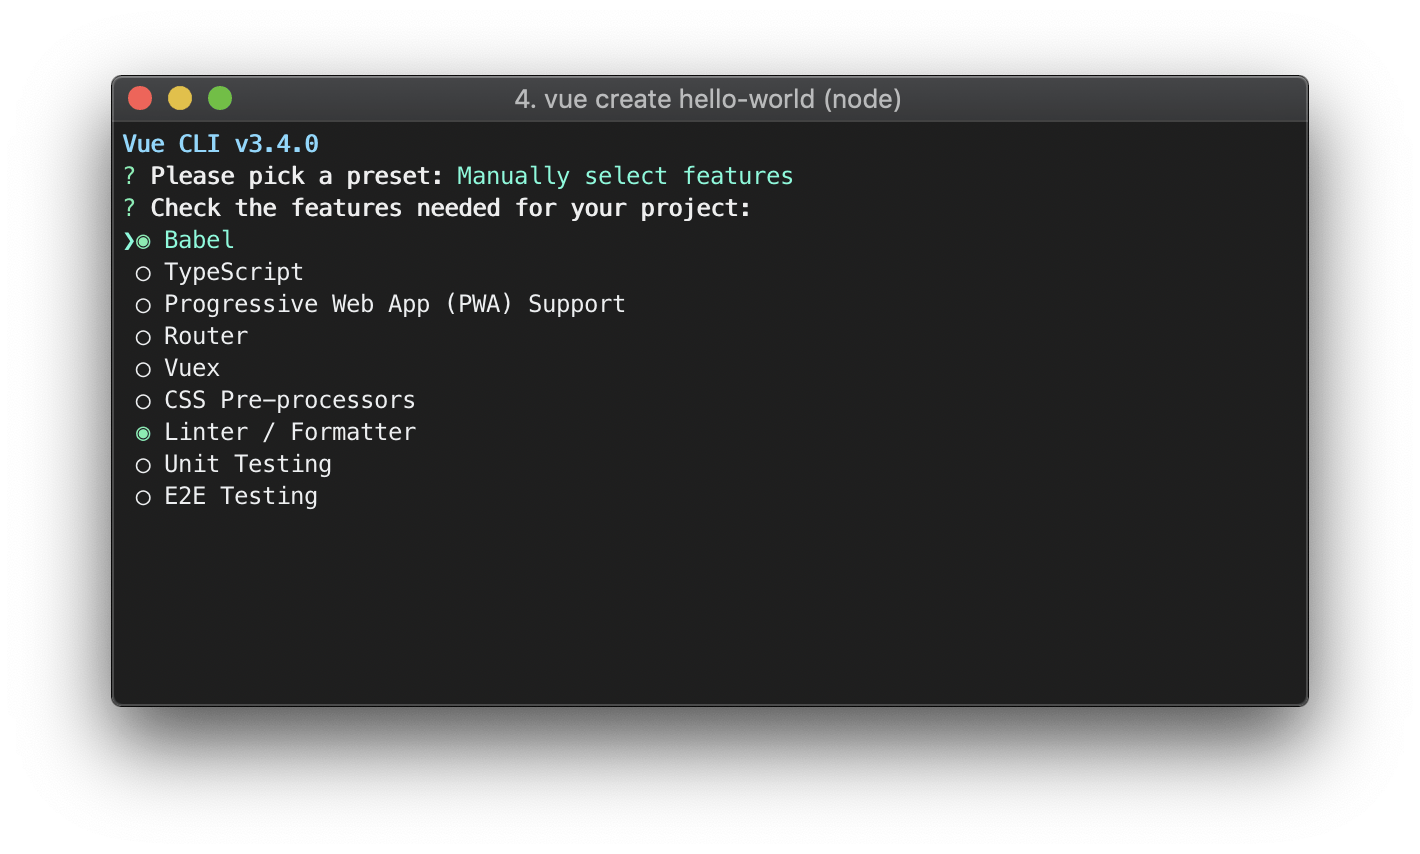
Creating project from scratch
You can select Vuex automatically when creating a new project using the vue cli but you have to install the cli first by running-
npm install -g @vue/cli
 OR
yarn global add @vue/cli
after the cli is installed you can create a new project by running-
vue create project-name
you will then be prompted to select some basic setup. In your setup, select vuex!
Adding vuex to an existing vue project.
If you have an existing project and you want to add vuex, run
npm install vuex
OR
yarn add vuex
create a store folder in the src directory of your app and create a store.js file in the store folder. Keep in mind that we will be performing all our vuex related code in this file for the rest of the article. Then put this code in the store.js file.
import Vue from 'vue'
import Vuex from 'vuex'

Vue.use(Vuex)

export default new Vuex.Store({
  state: {
  },
  mutations: {
  },
  actions: {
  },
  modules: {
  }
})
In your main.js file import your store and register it by adding :
import Vue from 'vue'
import App from './App.vue'
import store from './store' // add this line

Vue.config.productionTip = false

new Vue({
  store, // add this line
  render: h => h(App)
}).$mount('#app')
The reason we are adding the store above in our vue instance is so that we can use it in all our components in our application. We have finally set up our Vuex store. let us talk about the Vuex Patterns for managing state in the store.
State
Our store has some similarities to our Vue instance. For example state in the store is similar to the data object in the vue instance, both of them store data in our application
 state: {
      name:"Uma Victor",
      Likes: "Anime",
      Music:"AOT opening"
    }
  },
We can output the state in the store in a number of ways to our component template.
Directly in the template
<template>
    <div>
        <h1>Hey! my name is {{$store.state.name}}</h1>
    </div>
</template>

Returning state in computed property in our component'
This will also give us the same result as above:
<template>
    <div>
        <h1>Hey! my name is {{Name}}</h1>
    </div>
</template>

<script>
export default {
  name: 'Quiz',
  computed: {
    Name () {
      return this.$store.state.name
    }
  }
}
</script>
returning the store state in computed whenever we need it can be verbose, so vuex provides us with helpers. The helper for states in vuex is the mapstate helper. Using Object destructuring, it looks like this.
<script>
import { mapState } from 'vuex'
export default {
    computed: {
    localComputed () {
      return 'local-computed-value'
    },
    ...mapState({
      name: 'name',
    })
  }
}
</script>
Note:The 'name' in a quote has to be exactly what we named it in our vuex store while the object key name without quotes can be named whatever you like and is what is actually used in the template.
Or you can just use the array form and make sure name in quotes in the array is exactly the name of the variable in our store :).
...mapState(['name'])
All this will still give us the same result we had earlier.
Getters
Getters are also similar to computed properties in the vue instance, just like computed properties their results are cached and if there is a change in the data it uses for operation, that change will be updated immediately.
  state: {
    name: 'Uma Victor',
    Likes: [
      { id: 1, Anime: 'Demon Slayer', watched: true },
      { id: 2, Anime: 'Death Note', watched: false },
      { id: 3, Anime: 'My Hero Academia', watched: false }
    ]
  },
  getters: {
    unwatchedAnime: (state) => {
      return state.Likes.filter(anime => !anime.watched)
    }
  },
The getter above will return all anime show that has not yet been watched.
In our component, we can access the getter by:
 computed: {
    ...mapGetters({
      unwatchedAnime: 'unwatchedAnime',
      })
  }
Mutations and Actions
Mutations are what update/mutates the state in vuex. They are the management patterns that directly change the state of our store. Mutations are just like regular methods you call when a user interacts with your app.
Let's say we are creating a vue app, and we want the users to be able to increase and decrease the font size. let's create this.
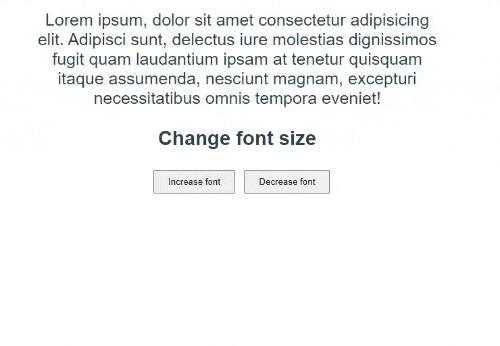
we'll see how we can accomplish this with mutations.
First create a new component in your component folder, name it whatever you want. We will be working on only this component and our store.
In our store state, we will create a sizeOfFont variable
 state: {
    sizeOfFont: 10
  },
Then bind the fontSize in our style with sizeOfFont variable from our store, mapped with mapState in our component.
Add two buttons to increase and decrease the font size, add a increaseFont() and decreaseFont()function call to the buttons when clicked.
<template>
  <div class="head">
    <div :style="{fontSize: sizeOfFont + 'px'}">
      <p>
        Lorem ipsum, dolor sit amet consectetur adipisicing elit. Adipisci sunt,
        delectus iure molestias dignissimos fugit quam laudantium ipsam at
        tenetur quisquam itaque assumenda, nesciunt magnam, excepturi
        necessitatibus omnis tempora eveniet!
      </p>
      <div>
        <h3>Change font size</h3>
          <button @click="increaseFont()">Increase font</button>
          <button @click="decreaseFont()">Decrease font</button>
      </div>
    </div>
  </div>
</template>

<script>
import { mapState } from 'vuex'
export default {
  name: 'Quiz',
  computed: {
    ...mapState(['sizeOfFont'])
  }
}
</script>
When the increase font button is clicked it runs the function in our script, but all our increaseFont() function does is call a mutation "INCREASE_COUNT".
The way it does it is by committing our mutation in the methods options as shown below.
<script>
import { mapState } from 'vuex'

export default {
  name: 'Quiz',
  methods: {
    increaseFont () {
      return this.$store.commit('INCREASE_COUNT')
    },
    decreaseFont () {
      return this.$store.commit('DECREASE_COUNT')
    }
  },
  computed: {
    ...mapState(['sizeOfFont'])
  }
}
</script>
Back in our store file, we add the mutation
 state: {
    sizeOfFont: 10
  },
mutations: {
    INCREASE_COUNT: state => {
      state.sizeOfFont += 3
    },
    DECREASE_COUNT: state => {
      state.sizeOfFont -= 3
    }
  },
Our mutation above accepts the state as an argument. Then adds 3 to sizeOfFont each time INCREASE_COUNT is committed.
We can also dynamically use mutations. Let's say we create an input and want the user to dynamically change font size instead of increasing by 3 every time.
all we have to do is create a variable in our data, let's call it value. Then v-model it to our input.
template
<input type="number" v-model.number="value"/>

script
data () {
    return {
      value: null
    }
we can accept our modeled value as arguments when committing our mutations
 methods: {
    increaseFont () {
      return this.$store.commit('INCREASE_COUNT', this.value)
    },
    decreaseFont () {
      return this.$store.commit('DECREASE_COUNT', this.value)
    }
  },
this is then passed as a payload in our mutation, then we add our payload to our sizeOfFont state.
 state: {
    sizeOfFont: 10
  },
  mutations: {
    INCREASE_COUNT: (state, payload) => {
      state.sizeOfFont += payload
    },
    DECREASE_COUNT: (state, payload) => {
      state.sizeOfFont -= payload
    }
  },
Note: It is good practice to name our mutations in all capital letters. so that we don't confuse things.
Actions
Actions are just like mutations, the difference is actions do not directly mutate the state, instead, they commit mutations. Also, mutations are synchronous while actions are asynchronous. That is our code is run line by line in our mutations and we cannot fetch outside resources from it. Actions allow us to do all that and more.
Actions wrap mutations and carry all other business logic in it. It is best practice to always wrap mutations in our actions, as it allows us to carry out time travel debugging in our dev tools in chrome. what this means is when there is an error in our application due to a change in state, we can track it from the dev tools and check the time such an error occurred, and in what state it was when it occurred.
Let's see how this works in practice by creating a loader. when the user clicks on load post, the app fetches all the post, while fetching the data, the loader shows so that the user gets visual feedback on what is happening. After fetching the data our loader stops and all the posts are displayed. we will be using the browser fetch API to fetch our post from an api.
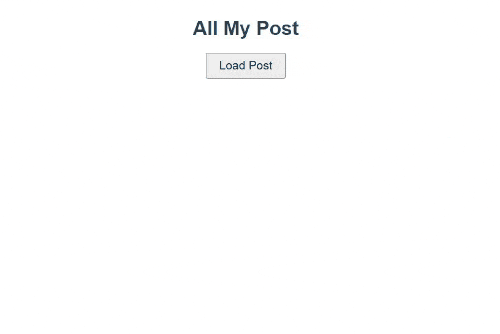
For this, we will create a Blog.vue and Post.vue component.
All the posts will be in our post component.
Then in our store, we will create a loading variable which will be a boolean to determine if it is loading or not. Then a post array to hold all our posts
 state: {
    Loading: false,
    posts: []
  },
In our app component, we will import Blog.vue component and conditionally render our loader based on the current state of loading.
Then create a load Post button.
<template>
  <div class="head">
    <h1>All My Post</h1>
      <div class="load-container">
        <p class="loader" v-if="Loading"></p>
      </div>
     <button @click="loadData()">Load Post</button>
    <Post/>
  </div>
</template>
When the load post button is clicked, it fires the loadData function which in turn dispatches an action SET_STATUS
 methods: {
    loadData () {
      return this.$store.dispatch('SET_STATUS')
    }
  },
In our store actions where SET_STATUS
is defined
 mutations: {
    LOAD_POST: (state, data) => {
      state.posts = data
    },
    START_LOADING (state) {
      state.Loading = true
    },
    STOP_LOADING (state) {
      state.Loading = false
    }
  },
  actions: {
    SET_STATUS: ({ commit }) => {
      commit('START_LOADING')
      fetch('https://jsonplaceholder.typicode.com/posts')
        .then(response => response.json())
        .then(data => {
          commit('LOAD_POST', data)
          commit('STOP_LOADING')
        })
    }
  },
Our SET_STATUS accepts a destructured commit method gotten from our context object vue provides for us. The commit method is used to commit mutations. As we can see above, theSTART_LOADING mutation is first committed which sets our loading status to true.
This means our loader is showing right now.
Then an asynchronous request is made with fetch API to get our posts.
When we get our response, we commit our LOAD_POST mutation with the data received as a payload, then set our post array in the state to the data.
We can now populate our Post component with the post received.
Then finally we commit our STOP_LOADING mutation that sets the loading state to false again. stopping our loader from displaying.
Things to note
- state and getters should be placed in the computed properties while actions and mutations in the methods option in the component.
- Mutations are committed, while actions are dispatched
- Mutations are synchronous, While actions are asynchronous.
- All business logic should be carried out in actions
Wrapping Up
I hope, this article helped you learn about state and state management in vue using vuex. I would be happy if it did.
Make sure to subscribe!!, as we will be "getting our hands dirty" building a quiz application with vue and vuex in my next article.