Communicating Between Components in Vue.

I have 5 years of software development experience, a BSc in computer science, and 3 years specializing in building frontend and mobile UI with Typescript, React, Next.js, React Native, and Redux.
Outside of programming, I love to teach and educate other developers through articles, YouTube, and TikTok.
In your vue application, there will come a time when you'll need to share data between components. Things can get messy really fast if you do not understand how communication between components works in Vue. In this article with some examples, we will learn to communicate effectively between Vue components.
Ways we can share data in Vue:
We are going to learn:
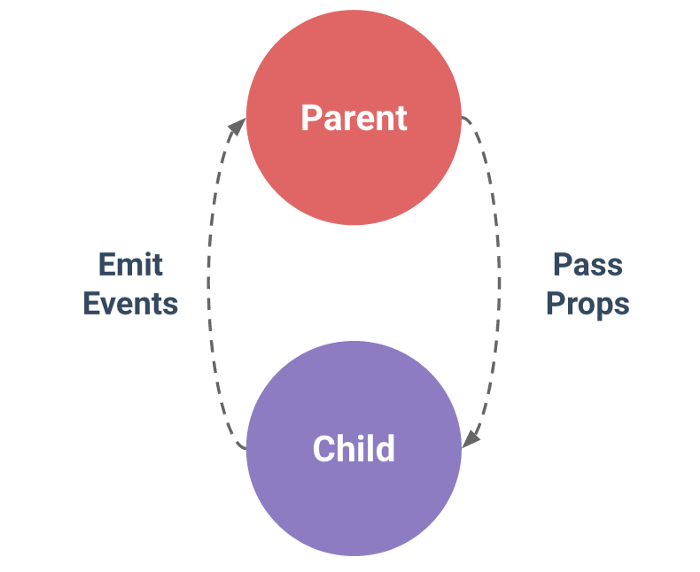
- How to pass data down from Parent to Child Component using props
- How to pass data from Child to Parent Component using an Emmitted event
So let's get started 🙂🙂
1. Passing props from parent to child component
Let's say we are building this fun E-commerce project and we have two components, ComponentChild to represent the Child component and ComponentParent to represent the Parent component.
And we have data in the parent component we will like to access in the child component, Woo-hoo!! that's when props come to the rescue.
So imagine the data we want to be passed down from the parent to the child component is the total number of items a user adds to his cart.
The totalitems variable is created in the data object.
//Parent Component
<template>
 <div>
   <ComponentChild :total="totalItems"  />
 </div>
</template>

<script>
import ComponentChild from "@/components/ComponentChild.vue";

export default {
 components: {
   ComponentChild,
 },
 data() {
   return {
       totalItems: 5,
   }
 }
}
</script>
We are going to use the VueJs v-bind directive or : for short to dynamically pass props from the parent to the child.
So maybe we want to use the value of the totalItems in the child component, or maybe we just want to output the value in the child component.
The code will resemble this:
//parent component
 <ComponentChild:total="totalItems" />
So in the code above, we have bound total to the totalItems data in our parent component.
You need to know that total is now equivalent to totalitems and you can now pass total as a prop in your childcomponent and use it in your component template like it's a local data.
<template>
 <div id='cart'>
 <p>Total items is {{total}}</P>
 </div>
</template>

<script>
export default {
 props: ['total']
}
</script>
Note: There are situations where you do not want to use the props directly within your child's component template, rather you want the prop to exist as a local data in that child component.
using the this keyword that binds to the vue instance, you can create a local data in your child component and assign it to the data variable created like this:
data() {
  return {
    total: this.total
  }
}
Then you can manipulate the data in any form you like and use it in the component template.
You can read more about props here.
2. Using emitted events to pass data from child to parent

So that is me above when I tried understanding how emitted events work for the first time while learning Vue.
There are two things to understand here when emitting events:
Event listening
This is just your regular way of listening to an event using the v-on directive in Vue. You can also use the @ short form instead of v-on.
Custom events
"hmm.. what are custom events?" you might ask. Don't worry I'm going to explain all that.
We know that in Vue when you want to pass an event, you use a v-on directive to listen to whatever event you are passing. for example, listening to a click event
v-on:click="doSomething()"
It's the same way we have custom events, the difference is that custom events have to be emitted using the $emit() method Vue provides us with.
and they can be named as you like.
//childComponent
v-on:click="$emit(myCustomEvent)"
//parentComponent
v-on:myCustomEvent="functionThatDoesSomethingAfterListeningTomyCustomEvent()"
Let's look at an example where we want something like a Starbucks changer app.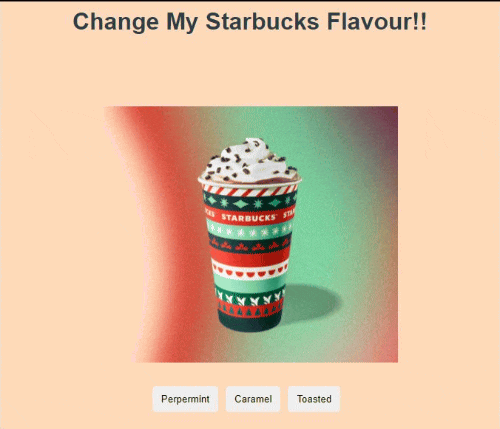
Note: This is not actually a real-world app, it is just used to explain the concepts.
You can play with the code on codesandbox
The functionality of the app below is whenever you press any of the buttons, it changes the flavour of your Starbuck :).
so let's see how this is achieved using emitted events.
Let's create our App.vue file. Then in our Components Folder, we create two components HelloBucks.vue representing parents component and BucksChanger.vue representing the child component.
This is what we have in our App.vue file
<template>
  <div id="app">
    <HelloBucks msg="Change My Starbucks Flavour!!" />
  </div>
</template>

<script>
import HelloBucks from "./components/HelloBucks";

export default {
  name: "App",
  components: {
    HelloBucks,
  },
};
</script>
In our HelloBucks.vue component, we will have an HTML img tag with its src attribute bound to an Img variable in our data object.
<template>
  <div class="hello">
    <h1>{{ msg }}</h1>
    <div class="container">
      <img :src="require(`../assets/${img}.png`) "alt="Test img" width="400"/>
      <BucksChanger></BucksChanger>
    </div>
  </div>
</template>

<script>
import BucksChanger from "@/components/BucksChanger";
export default {
  name: "HelloBucks",
  props: {
    msg: String,
  },
  components: { BucksChanger },
  data() {
    return {
      img: "starbucksone",
    };
  },
  methods: {
    changeFlavour(flavour) {
      this.img = flavour;
    },
  },
};
</script>
In our BucksChanger.vue component, we create three buttons each when clicked is supposed to emit an event to the parent HelloBucks.vue component.
<template>
  <div>
    <button>Perpermint</button>
    <button>Caramel</button>
    <button>Toasted</button>
  </div>
</template>
In order to emit the events from the click of the buttons, we then apply a v-on:click event listener to each button and execute a function chooseStarBucks(flavour) the flavour argument represents the flavour of starbucks we want.
when the chooseStarBucks(flavour) is called, all it does is emit whatever event we want it to emit in this case flavour-chosen.
<template>
  <div class="btnwrap">
    <button @click="chooseStarBucks('perpermint')">Perpermint</button>
    <button @click="chooseStarBucks('Caramel')">Caramel</button>
    <button @click="chooseStarBucks('Toasted')">Toasted</button>
  </div>
</template>
<script>
export default {
  methods: {
    chooseStarBucks(flavour) {
      this.$emit("flavour-chosen", flavour);
    },
  },
};
</script>
Note:The flavour-chosen event is also passed along with our flavour argument so that it can be used in any form in our parent component. Also while we use $emit like that in our template, we have to use it as this.$emit in our script.
this.$emit("flavour-chosen", flavour);
So back in our HelloBucks.vue component, we have to listen to our custom flavour-chosen event and run a function, lets call the function changeFlavour. Our changeFlavour function then updates our img variable that is bound to the src in our template with the flavour of starbucks specified in our argument.
<template>
  <div class="hello">
    <h1>{{ msg }}</h1>
    <div class="container">
      <img :src="require(`../assets/${img}.png`)" alt="Test imgg" width="400" />
      <BucksChanger @flavour-chosen="changeFlavour"></BucksChanger>
    </div>
  </div>
</template>

<script>
import BucksChanger from "@/components/BucksChanger";
export default {
  name: "HelloWorld",
  props: {
    msg: String,
  },
  components: { BucksChanger },
  data() {
    return {
      img: "Perpermint",
    };
  },
  methods: {
    changeFlavour(flavour) {
      this.img = flavour;
    },
  },
};
</script>
And our app is up and running!!.
Wrapping Up
I hope, this article helped you learn how to communicate between parent and child components in Vue. If it did, please let me know!!.
As your app grows, you will eventually need to add
Vuex a state manager to manage all your states.
Make sure to subscribe!!, as I will talk about this is my next article.


